There are lots of reasons why you might need to drain the central heating, and the chances are it’s something that you’ll need to do sooner or later. First and foremost, taking good care of your heating system is important to getting and maintaining high performance levels.
It’s a good idea to undertake routine maintenance. This will involve draining and cleaning the central heating system to expel pollutants like rust, limescale and dirt. These are all things which can naturally find their way into your system and inhibit its performance.
If you’re planning some repairs to the central heating system or radiators, it will probably be necessary to drain them before you start work. And if you’re installing new radiators, you’ll want to get all the water out of the system before you disconnect the old units.
Heating professionals strongly recommend adding an inhibitor to the water in your system. This is a special mix of chemicals which prevents corrosion, and also extends a radiator’s lifespan and optimal heating performance. An inhibitor attacks those unwelcome pollutants and defends against them. You can add an inhibitor to the water before you refill the system.
Draining the system and bleeding radiators is a relatively standard procedure, and as such you’ll be able to find most of what you need around your home or garden. Try to locate:
Draining the system can be quick and painless if you follow the steps we’ve laid out for you here. Sometimes though, something a little more serious may be necessary. If you find that your boiler has given up the ghost, or you’re interested in a new boiler, get in touch today. Our friendly team can answer any questions and give you a free, no-strings quote.
The first step in the process is to turn off the heating. This may sound simple but it’s an important safety measure, and you’d be surprised how many people forget to do it. You’ll need to wait for the hot water in the system to cool down, which usually takes 30 – 60 minutes. If your boiler runs from a solid fuel fire, put out the fire and wait for the hot water to cool.
This is an essential step – you definitely don’t want dirty water running through the system when you’re trying to drain it.
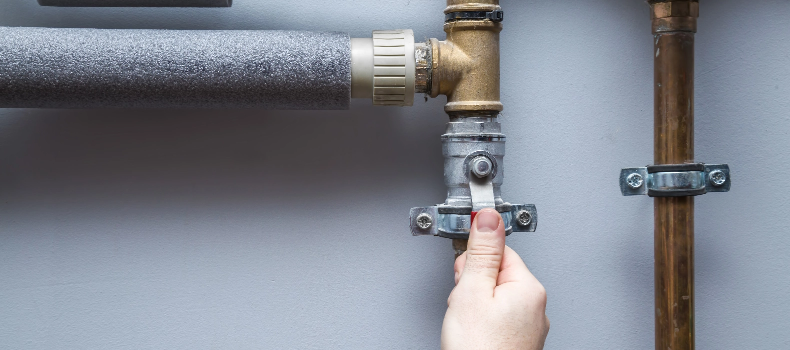
There are a couple of different ways you can cut the water. The first is to totally shut off the supply for the entire building. You can do this at the main stopcock – there’ll be a tap or valve, which you can turn on and off with a screwdriver. Be aware, though, that this will cut off the water to the whole property, and there will be no running water until you turn the mains supply back on again.
If your system runs on a conventional or regular boiler, you’ll need to isolate the heating tank. This means that there will be no new water going into the tank, and will allow the water currently in the system to drain. You should be able to find a tap or valve on the side of the tank. Then, switch off the boiler.
If you’re running a combi boiler, simply turn it off and wait for the system to cool. Not sure what boiler you have? Bbright can help you identify your boiler, and work out which model is the best fit for your home.
(If none of your radiators have a drain-off valve, you have a slightly different system. Skip ahead to the next section).
Usually, a central heating system will have a main radiator. This is typically located on the ground floor, in a central position of the floorplan. The main radiator will have a small tap or drain valve attached to it – this is the drain-off valve (or draincock), and all the other radiators will drain through here.
Once you’ve located the drain-off valve, use a jubilee clip to attach the hosepipe to it. Check that it’s attached securely. To be on the safe side, put a few towels on the floor beneath it, as there’s no guarantee you won’t get a couple of drips.
You won’t want the drained water coming out anywhere in your home. Run the hosepipe through the house to a safe area outside. A street or gutter drain would be ideal. The drained water will probably contain some chemicals that you’ll want to keep away from plants and animals, so try not to drain the system straight onto the lawn or flowerbeds.
Now it’s time to open the drain-off valve. Loosen it, and you should start to hear the water flowing through the hosepipe.
Next, go to all the other radiators in the house and open the drain valve, called the regulator (note: this is different from the temperature-controlling valve, and usually on the opposite side).
The next thing to do is release all of the trapped air from the system. To do this, open the bleed valve (using the radiator bleed key) on all radiators. You’ll hear a hissing or sucking noise when the air rushes out. A pro tip is to start with the upstairs radiators, wait 15 minutes, and gradually move to the downstairs radiators. This helps the system drain faster.
Don’t forget about any heated towel racks or spare room radiators on your way, and you’ll want to put some towels down, as opening the bleed valve can sometimes release one or two drops of water.
Check on the hosepipe. Once there is no (or very little) water coming through, the system is drained.
Finally, you’ll need to put new water into the central heating system. If you’re adding an inhibitor, now is the time to do so. Close the drain-off valve and all the radiator bleed valves around the house.
Now you can safely turn the water supply back on. You’ll need to bleed the air from radiators again. This time, start with the downstairs radiators, and work your way up. Make sure that all the air is expelled from the radiators – again, you might see a couple of droplets coming from the bleed valve, so keep those towels underneath for now.
Tighten up the bleed valves, and check that each one is closed. Turn on the heating system and let it run. Check that all radiators are heating up, and that there are no cold spots – an indicator of trapped air. While you wait, have a look around the different rooms, and check all the radiator valves to make sure there are no leaks.
If none of the radiators in your home have a drain-off valve, the process of draining your system will be slightly different.
Steps 1 and 2 are exactly the same procedure.
Next, you’ll need to isolate the radiator from the heating system. To do this, close both valves on the radiator – the regulator, which lets water in, and the lockshield, which controls the temperature. Then you can bleed the radiator.
Without a drain-off radiator valve, you’ll need another way to let the water out of the radiator. There will be a coupling nut, often located close to the regulator valve. Remember to put a bucket (or large bowls) and some towels underneath, and, using a spanner, twist the nut until the water comes out. Continue until all the water has drained.
Hopefully, you should now feel ready to take on the draining of your own central heating system and be equipped with the knowledge to do so. But if you still have questions or concerns about draining central heating, or encounter a problem along the way, don’t hesitate to contact our professional team.
Many people are concerned about the cost of keeping their home nice and warm, and with the price of energy on the rise, it’s something we could all do with keeping an eye on. Here at Bbright, we’re experts in heating systems, and our top tips will help you squeeze maximum value for money out of your central heating system.
If you’re looking to save money on your central heating, the best place to start is with your boiler. Boilers provide the hot water that gives a central heating system its heat, and a good one runs smoothly and efficiently. If your boiler isn’t working well, it acts like a dripping tap on your energy bills.
It’s well-known among heating technicians that boilers of a certain age are simply not as efficient as newer, more advanced models. Generally, a boiler which is over 10 years old is highly likely to be costing you money as compared to a newer, more efficient replacement. If you suspect your boiler has seen better days, it might be time to think about a boiler replacement.
It’s also worth having a look at your boiler efficiency rating. These days, condensing boilers regularly score 90%+ efficiency, which is optimal. On the other hand, standard efficiency boilers often struggle to break the 80% threshold. This may sound marginal, but could represent a surprising cost difference in the long run.
When was the last time your boiler had a good service? Like most home appliances, our boilers need a regular tune-up to make sure they’re working properly and running to their best potential – and at optimal cost-efficiency. Our friendly and professional team of engineers are available to facilitate boiler repairs and servicing as and when you need them.
A lot of people think that running the central heating on a low temperature all day is more efficient than turning it on and off. This is actually an urban myth. In fact, it’s far more effective to run the heating only when it’s needed, and to have it turned off at all other times.
Think of it in terms of energy loss. It’s an inevitable fact that, whenever we run our central heating, there will be some heat lost through the floors, walls, windows and ceilings. If the heating is on all day, even at a low temperature, there is a longer timeframe for heat – and money – to escape. On the other hand, a shorter period of heating time means less opportunity for wastage.
On a similar note, think about when you actually need your home to be warm. Is it really essential for the radiators to be pumping out heat when the family is sleeping, or when everyone is at school or work? If the answer is no, you probably stand to make savings by using the timer on your boiler. Doing so ensures that you’re only heating your home when there are people around to feel the benefit – again, meaning less money spent on wasted heat. Boilers typically come fitted with either a digital or an analogue (‘mechanical’) timer. Read our handy guide on how to set your boiler timer here.
Many people assume that, when the central heating is on, the whole house gets heated. While this can be true, if you want it to be, there is another way.
Ask yourself: does your home need the spare bedroom and both bathrooms heated, if no one is occupying those rooms? Be selective about where the heat goes, and try to provide heat to only those rooms where people spend a lot of time, like the kitchen or living room. This can have a massive impact on the amount you spend.

The chances are that, if you turned down your thermostat by 1°C, no one would notice the difference. But, shockingly, even that tiny adjustment can lead to a saving of £75 per year.
It’s good heating practice to be measured when selecting your thermostat’s temperature. After all, the best way to save money is to avoid spending it in the first place.
In a similar way to boilers, older thermostats are just not as efficient as modern units. We’ve seen old thermostats with a 5°C margin of error in their temperature detection. That means that the central heating system will actually heat the room to 5°C over the desired temperature, before powering down. This kind of inaccuracy means extra money on your bottom-line energy bill that you didn’t need to spend. If your thermostat is older than around 10 years, it might be worth considering replacing it with a newer, more accurate alternative.
Hopefully now you have a few ideas about the different ways you can save some cash on your central heating. Don’t forget, there’s also the potential to get cosy with a chunky, faithful old sweater, a blanket, or a hot water bottle – and a nice hot cup of tea never goes amiss!
But if your boiler has given up the ghost, you won’t get any warmth from your central heating system at all, which can leave you with an uncomfortable and potentially dangerous situation. In this case, it’s time to seek a boiler replacement.
Generally speaking, there are three main types of central heating systems, and the wet central heating system is by far the most popular in the UK. However, as well as the UK’s standard, there are a couple of other options available: warm air systems and storage heaters. Let’s have a look at each of these:
As the name suggests, ‘wet’ central heating systems rely on water. The system is built around a boiler which burns fuel to heat water. This hot water is then distributed through a network of pipes.
Often, the pipework feeds into radiators, which heat the room via a process called ‘convection’. This means that the radiator heats air around it, causing the warm air to rise, and cold air to fall. This cold air is heated in turn, and a circulating system of heat energy moves around the room, warming the space.
Sometimes, a wet central heating system may link to a large tank, known as a hot water cylinder. This will depend on the type of boiler you have.
Warm air systems are more popular outside the UK, however they were occasionally installed in Britain during the 1960s and 70s. With a warm air system, the central boiler heats air, usually by burning natural gas or a fossil fuel. It then distributes the hot air to a vent in the floor or wall. The system requires a heat pump on the wall outside to perform the heat exchange. Heated air systems can also double as air conditioning systems, and you’re most likely to see them in large commercial buildings.
Storage heating systems are powered by electricity. They use special bricks, which are designed to hold large amounts of heat. The system is linked to the electricity grid and the bricks are heated at lower-cost, off-peak times: late at night, for instance. They then slowly release that heat over the following day.
There are three main types of boiler used to power central heating systems, and the type of boiler used will depend on the age of the building, the age of the system, or the preferences of the owner.
Combi, or combination boilers, are usually the quickest, most efficient and most cost-effective option available. They’re able to run the central heating and provide hot water on demand from a single gas boiler unit. Combination boilers heat water instantly, meaning there is no hot water cylinder or storage tank to think about.
Regular boilers, sometimes called conventional boilers, are the traditional system, more typically found in older homes. Hot water and central heating are controlled separately. Regular boilers heat water and store it in a hot water cylinder ready for use in cold weather. The gas boiler itself, as well as the tank, are usually located in an airing cupboard or the attic.
System boilers are incredibly reliable, and typically run without issues for at least 15 years. Like regular boilers, system boilers need a tank and hot water cylinder. They are often the best choice for larger homes with greater hot water demands.
In most cases, heat generation occurs by burning natural gas, and though they do burn fuel, these modern central heating systems have impressively high efficiency ratings. However, if your system boiler is more than fifteen years old, there’s a good chance it is not the most economic or energy-efficient system available. This can mean that when you turn on the central heating, it’s costing you more than it needs to. Find out if replacing your boiler could save you money.
The system you have in your home will affect the way you control your central heating (and hot water).
This is the small box with a dial on the wall, usually in the living room or hallway. The thermostat measures the central heat inside the house and, depending on your selected setting, starts or stops the boiler sending hot water around the central heating system to the radiators.
Not all the radiators need to be running the same temperature. You can adjust them using the radiator valves. These are located on the side or back of individual radiators. They are used to adjust and control the temperature of specific rooms. Essentially, they block off the flow of hot water when the radiator gets up to temperature. It’s not very efficient to twist the radiator valve to completely ‘off’ or fully ‘on’; better to use the middle range of settings to find the perfect temperature.
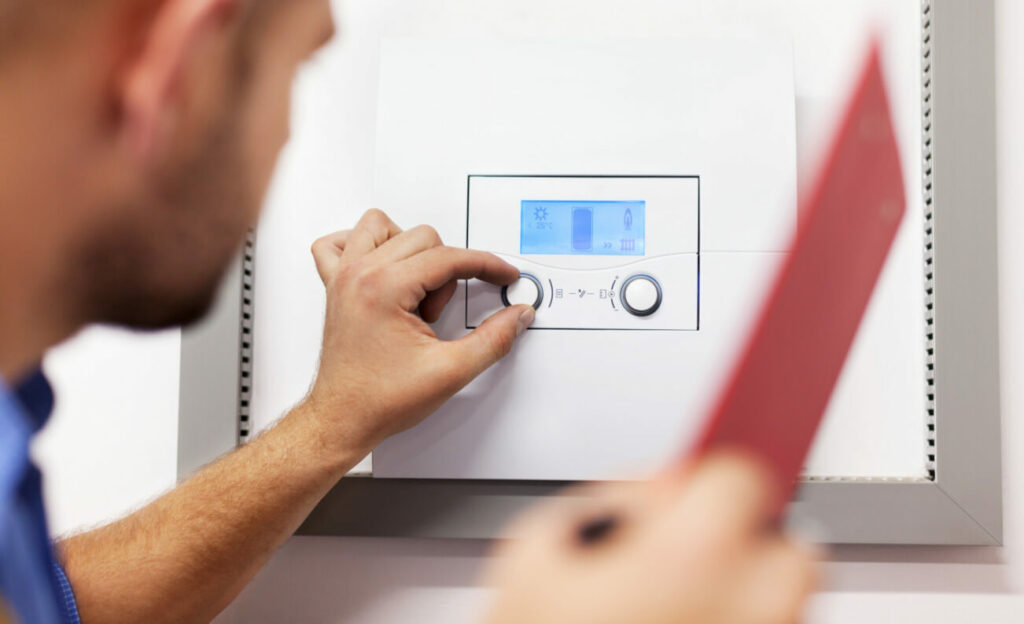
The programmer is a control panel, located somewhere in the system, giving you control over what time the system turns on and off. Using the programmer is a great way to increase efficiency and reduce your carbon footprint. For a combi boiler, the programmer controls only the central heating. In other systems it may apply to the hot water, heating, or both. Modern boilers use an electric or digital programmer. Older models tend to have an analogue clock which uses pins.
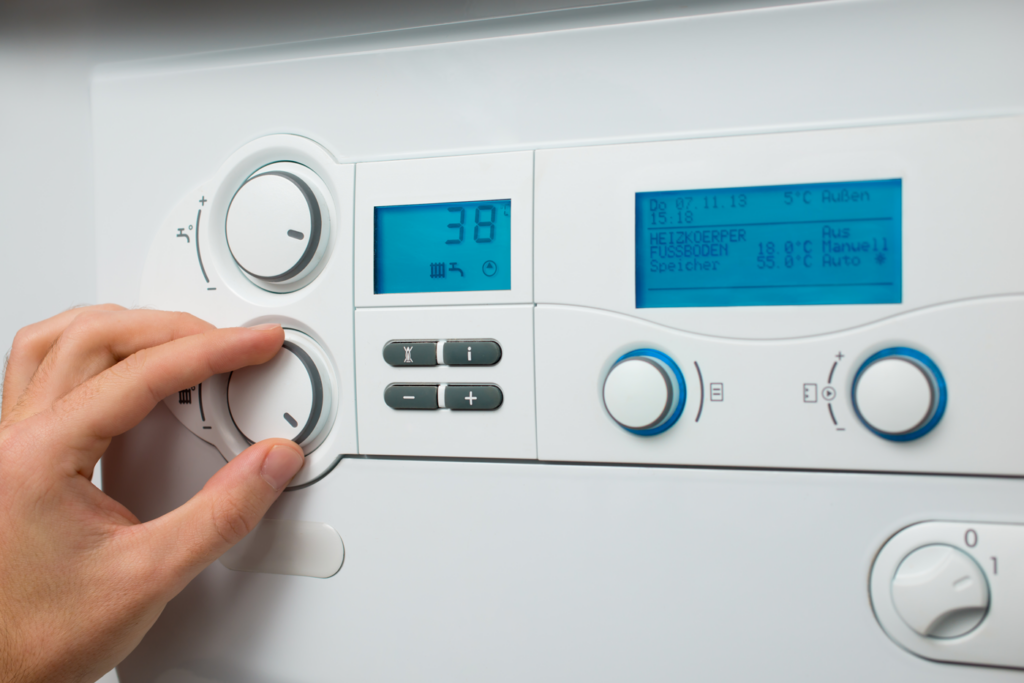
This is a thermostat located on the side of the boiler itself. It is used to control the temperature that the boiler heats water up to, before it gets sent to the taps or around the central heating system. Combi boilers will have two thermostats on them, to control the hot water temperature and the central heating temperature independently.
If your system uses a hot water cylinder, there will be a thermostat fitted to the side of this unit, too. It is there for you to adjust the temperature of the water inside.
Whichever system or controls you have in your home, understanding what’s going on when you flick on the central heating is a great way to save on your energy bills and help reduce the effects of global warming. A little knowledge goes a long way, and getting to know your central heating system means understanding what’s happening behind the scenes.
Look for a button which says “clock” or “set time” on your control panel. Press it. Next, use the arrow buttons to find today’s day or date, and press the “select” button to confirm. Use the same arrow buttons to adjust the time. When you have the correct time and date on your digital boiler timer, use the “select” or “set time” button to confirm the setting.
You probably won’t want to have your central heating running all day, every day. Scheduling, or programming, allows you to set specific times for the central heating system to turn on or off.
There should be a button which says “program” or “set” (on some models, this is a switch). Press (or slide) it to enter scheduling mode. Now it’s time to think about when you want the hot water or heating to come on.
Again, use the arrows to navigate to the day of the week you want to set. Depending on the model and digital boiler timer you have, it may be necessary to select a time every day, or you may be able to group days together. Next, you’ll need to input the time for the boiler to come on. Once you have the desired time, use the “enter” or “select” button to lock it in.
After you’ve selected the time for the boiler to turn on, the programmer will switch to setting the turn-off time. Just like before, use the arrows to set the time, and “enter” or “select” to confirm. Depending on the model, some digital boiler timers support more than one timed setting per day.
Press the “set” button to confirm everything. This will remember your settings, and begin running your new boiler schedule automatically. (If your boiler has a switch, slide it to “run”).
Every mechanical boiler timer will have a round dial. This should be fairly easy to identify. The first step is to set the current time. Rotate the dial clockwise until you have it correct. It may not spin anti-clockwise.
The dial will be surrounded by pins. These look like a series of tiny switches, running all the way around. The important thing to remember is that each pin represents 15 minutes.
Have a look at the markings around the dial, and find the time you want your boiler to come on. Switch on the pin that corresponds to that time. (This may mean sliding the pin toward the center, or flicking it outward, depending on the model.) Push all consecutive pins, until you reach the time you want the boiler to turn off. For all times you want the central heating to be turned off, leave the pins as they are.
For example, if you want the boiler to be on from 06:00am-08:00am, switch on the pin at 6:00am, and every other pin until 08:00am. When the clock reaches 06:00am it will automatically start the daily cycle, and when it gets to 08:00am, it will automatically turn off.
This is an important last step but an easy one to forget. The mechanical timer will have a switch, with one option marked “timer” (this may be indicated by a small image of a clock). Make sure the switch is set to this position.
Whatever boiler model your home has, using the scheduling feature is a great way to save some cash and make your home more energy efficient. Energy costs are a concern for many, and understanding how your boiler timer works will give you the knowledge you need to keep those energy bills down and improve your home’s cost effectiveness. Plus, you’ll be able to stay warm and reduce your carbon footprint!
Radiators have long been the heat exchanger of choice for most households in the UK. They are connected to the central heating system and usually made from a heat-conducting metal like aluminium or cast-iron. The typical radiator is made up of two panels, connected by a grill, with fins running between them in a zig-zag pattern. The heat output is controlled by thermostatic radiator valves.
When your boiler runs heated water to the radiator system, the heat output happens through convection. This means that the radiator heats the air directly above it and, as the heat rises, cold air falls, which is then heated itself, creating an airflow loop that circulates hot air throughout the room. Radiators are effective at giving a blast of heat to the room, and there are countless design options available.
Underfloor heating uses a network of pipes or cables to heat the floor of a room. There are two main types of underfloor heating systems:
Hot water underfloor heating, sometimes called hydronic or wet underfloor heating, works on the same principle as the traditional central heating system. There are pipe networks beneath the floor, and when the system is switched on, hot water flows through them, radiating heat to the floor space above it.
The ‘dry’ system of underfloor heating gets its power from the electric grid, the same source of electricity for the mains supply in your home. Electrical wiring sits in the cavity underneath the floor and provides radiant heat when it is turned on. This wiring can be loose, or inlaid in a purpose-built mat.

Getting the correct ‘look’ for a room is an important consideration when designing a space, and that’s one of the main reasons so many people are turning to underfloor heating. It allows you to keep the room’s heating system totally invisible, which allows spaces to have a more ‘open’ feel, without wall space needing to be broken up by radiators. On the other hand, when it comes to design choice for radiators, your options are practically unlimited. Alongside traditional models, there are countless customisations you can select in terms of colour, shape and size, and many people use feature radiators for a conversation piece in a room.
In terms of installation, most homes in the UK are already installed with radiators, meaning you don’t have to do anything – or at least, very little. Treated well and properly maintained, a typical radiator is good to go for at least ten, if not fifteen, years. When it does finally need replacing, it’s simply a matter of removing the old one, fixing a new one to the wall, and connecting it to the central heating system. This is a quick and easy job for a professional.
If you’re looking to install underfloor heating in a new build, the process is also relatively painless, since you’re able to put the system in place before you add the final flooring level. Installing underfloor heating as a retrofit, though, can be more of a challenge. You can save some hassle if you go for electric underfloor heating, because the wiring tends to be quite thin and can be squeezed into place. Hot water underfloor heating requires more space for the pipes, and this may involve elevating the floor level, a particular pain point in older homes. You’ll also need to think about the structural integrity of the flooring, and whether it will conduct heat properly, too.
The daily, operational efficiency of the two systems is another crucial factor. While the typical central heating system runs at 70°C-90°C, water-based underfloor heating works at only about 35°C. This means the water needs much less heating, and that can lead to big savings on your energy bills. Underfloor heating is especially efficient when used in conjunction with a heat pump stationed outside the home.
Generally speaking, underfloor heating tends to be more efficient for large, open-plan spaces, whereas radiators are more effective at getting a smaller room (like a bedroom or bathroom) up to a comfortable temperature. With that said, radiators are much faster-acting than underfloor heating, so you may find that underfloor heating systems need to be turned on for longer. And, while radiators have some tried-and-tested metals as their core material, effective underfloor heating may need to be paired with particular flooring, like vinyl or specially-engineered wood.
As we said earlier, a good radiator can continue running at peak efficiency for fifteen years or more. However, to see that kind of lifespan you would need a top-line radiator unit and to take good, regular care of it. On the other hand, underfloor heating manufacturers boast that their water-based piping can run happily for more than fifty years, though again, this would entail semi-regular maintenance, checks and servicing. It’s important to remember that where radiators are comparatively easy to maintain, underfloor heating can be far more difficult to uncover for repairs or replacement.
When it comes to the running cost of underfloor heating and a radiator system, the figures are broadly similar. Running costs depend more on how much you choose to spend on energy and your home’s insulation-efficiency than the systems themselves. However, when you combine underfloor heating with a heat pump it becomes highly efficient, and that leads to big savings on cost. The price of electricity is much higher than the price of gas, and as a result the running cost of electrical underfloor heating can get significantly higher.
Any decision about heating systems needs to consider the quality of the existing insulation and windows in your home. It may be a good idea to get an estimate of your room’s heat loss, and base your decision on that – often, it’s worth upgrading your insulation at the same time as your heating system, as that can have a massive impact on your heating bills.
Many people choose underfloor heating in their bigger, most-used rooms like the living room or kitchen (especially if they’re open plan), and have radiators in the bedroom or bathroom. This can be extremely energy efficient and makes good sense economically because you can adjust your heating usage to suit your lifestyle.
One drawback of radiators is that the process of convection stirs up dust in the room and allows it to spread, which can be troublesome for people with allergies. An underfloor heating system does away with this concern.
If you do decide to go for water-based underfloor heating, be sure to earmark a space somewhere in the house to keep your control manifold. This is essentially the nerve centre of your system and allows you to independently control different areas of the house, though it’ll need its own dedicated space.
A better question might be: between underfloor heating and radiators, which system is best-suited for my home? With modern building design, underfloor heating may be a good match for open plan, well-insulated spaces, especially if it’s installed as part of the construction process. On the other hand, radiators are better for more traditionally-designed houses; they give you a quicker blast of heat, and are generally easier to maintain.
An electric boiler system simply uses electricity rather than gas to generate hot water. These boilers are connected to the mains electricity supply, and heat cold water that comes from the mains water supply, using a heating element similar to that in a kettle. The only real difference between electric boilers and traditional boilers is that they do not require gas. There has in fact been a lot of debate about whether electric boiler systems are better for the environment.
While electric boiler systems are not suitable for larger homes (due to them having limitations regarding how much water they can heat at any one time) they still offer a multitude of benefits for people with smaller properties.
As they are the newer boiler systems on the market, electric boilers are built with efficiency in mind. As water is heated directly through the system, this means that no energy is wasted as the system only needs to use electricity when heating or hot water is required, rather than needing to keep water hot for extended periods of time.
Because electric boilers don’t rely on elements inside the system moving to create heat, they are far quieter than traditional boilers. Plus, since they are usually designed for smaller homes, the units are always compact and able to fit in small spaces such as kitchen cupboards. This also means they are usually relatively quick to install.
Without the need for any gas, your home is arguably safer with an electric boiler. With a gas boiler, there is always the risk of fuel leakage which can be extremely dangerous. Electric boilers, since they only require electricity, do not have this risk.
It will come as no surprise that a more efficient boiler also makes a less expensive boiler. With a new, electric boiler model, you can rely on the system using as little energy as possible to heat the water needed for your home, meaning that you are provided with the heat quicker and at less of a cost. When you install an electric boiler system, you can rest safe in the knowledge that your bills won’t be skyrocketing anytime soon.
As previously mentioned, an electric boiler system tends to be unsuitable for larger homes. This is because they are limited to the amount of water they can heat at one time. If you have a home with 4+ bathrooms and multiple showers are in use at the same time, for example, the boiler system will not be able to meet your needs. If you need guidance as to which boiler system will work best for your home, just get in touch with our experts here at Bbright.
Usually, if you have had your boiler for more than 15 years, it will likely need to be upgraded – and not only because it might be falling apart or showing error codes. Older boilers tend to be far less efficient than newer models, and so getting a boiler upgrade will likely help you financially in the long run. Your home will be heated quicker and you will no longer have to worry about finding out-of-date replacement parts for your boiler!
Here are some other reasons why you might suspect it’s time for a boiler upgrade:
If your boiler is old or simply in need of an upgrade, you may have started to notice it emitting strange smells or making unusual rattling sounds. This is usually to do with the external pipes – sometimes there can be blockages which cause the smells, or a loosening of parts which can cause the rattling. Rattling may also mean there is an excess of air within the system. Whatever the cause, both these things are key indicators that your boiler needs to be replaced.
It’s not uncommon for boilers to need the odd repair, but when your boiler is regularly in need of attention from an engineer, new parts or leak fixes, this may be because it is out-of-date. Not only this, but many older boilers that are no longer being produced will sometimes require parts that are difficult to find online or not available at all. This can cause further issues and delay the boiler repair, potentially leaving you without heating. With a newer model, you will have a reassuring warranty and you will also be safe in the knowledge that no parts will be going out-of-date any time soon.
As mentioned previously, older boilers are usually far less efficient than the newer models available on the market, and so if you have had your boiler for several years, it should come as no surprise that your bills are creeping further up in price! Old boilers will need to work harder and use more energy to generate the same heat output as newer boilers, and so you will end up paying more for less efficiency. Quickly getting a new boiler installed should see your home heating up much faster and your bills plummeting back to normal.
At Bbright, we understand that replacing a boiler can be a hassle, so our engineers are here to make the process as simple as possible for you. We’ll help to make sure you’re choosing the right kind of boiler for your home, and that you reap all the benefits of the best boiler models on the market.
By far the best and most efficient way to make sure you’re keeping your house warm this winter while also saving money is to get a smart meter, and on top of that, use a central heating timer. A smart meter can provide you with complete visibility of the energy usage in your home, and you can use this data to inform how you time your central heating (whether you choose to do this automatically or manually).
Smart meters are designed to help you save money on your energy bills, so we recommend installing one sooner rather than later to encourage good heating habits for the future. Free smart meters are available with some of our boilers.
You will find that most homes are properly insulated, but if you’re finding that heat is escaping from your home quicker than it should be, it might be time for an investment into better insulation. While you’re waiting, try keeping your house warm this winter by making sure your curtains are closed when light isn’t coming in through the window.
Most of us are lucky in the sense that heating is readily available, but that shouldn’t stop us from using other heating methods every once in a while. Tricks like leaving your oven door open after it’s been cooking something or simply wrapping up warm can make all the difference and even save you a bit of money. Having more soft furnishings in the house can also help to keep the heat in, as can draft excluders.
You may also want to try rearranging your living room so that your sofa is not blocking your radiator (or indeed other rooms in which radiators are behind furniture). This will allow the heat to circulate more evenly around the room.
Of course, you won’t be able to heat your home in winter without an efficient boiler system in place. If you have had your boiler for a number of years and it is often in need of repairs, it may be time to bite the bullet and get a new one. Not only will you have fewer issues to deal with, but you will likely find that a newer model will heat your home quicker and more efficiently, keeping you warm throughout the winter months and saving you money, too.
There are a number of reasons why a boiler might need resetting, and you will usually be able to tell that it is experiencing a fault by locating a flashing light somewhere on the unit – or an error code if your model has an in-built screen. You may simply suddenly notice that you aren’t able to get heating and hot water in your home. Either way, resetting your boiler is a useful first step to take, as it will inform you whether the fault needs engineer’s assistance to rectify it.
If you suspect your boiler is experiencing more serious issues, for example a leak, frozen pipes or problems with the gas or electricity, we recommend you contact a Bbright engineer before trying any small fixes yourself.
‘Lockout’ means that your boiler is not working due to a safety fault. Boilers will automatically switch off to prevent danger, and so this could suggest that there is a serious fault. If you are experiencing a boiler lockout, be sure to contact an engineer as soon as you can.
Exactly how you reset your boiler will vary slightly depending on your make and model, and you should be able to find detailed information in your instruction manual. In this blog we will provide a general overview of reset instructions, but if you need further assistance you can always contact our experts.
All boiler models should have a reset button, and you will be able to find this on the outside of the unit. Its location will vary depending on your model, but in most cases it shouldn’t be too difficult to spot. If you are having trouble, consult your manual or call an engineer.
To reset your boiler, press and hold the reset button for about 10 seconds. Then, wait several minutes – your boiler may be starting up, and pressing the reset button again too soon will cause it to stop. You will be able to tell if your reset has been successful if any fault codes disappear, or if the flashing light becomes a steady light. You may also hear the system powering up again.
We recommend repeating the process only once more if the first attempt was unsuccessful. If you press and hold the boiler reset button too many times, you risk damage to the control panel. Try once more, and if you are still seeing no changes, then it’s time to call a professional boiler engineer.
IfIf you find you are resetting your boiler fairly frequently, this could mean your boiler is in need of an upgrade. Unfortunately, boilers do have an end to their lifecycle, and once they start needing regular repairs, you may also start to experience higher bill costs due to the boiler losing its efficiency. If you’re unsure, call an engineer to have them assess your boiler and recommend the ideal replacement.
If you’re just looking for the short answer to this question, then it’s ‘yes’. Underfloor heating systems can still work well even if carpet is installed on top, and there are even some additional benefits. Since radiators cause warm air to circulate, dust trapped in the carpet can circulate with it, which can be harmful to those with asthma or other allergies. However, with underfloor heating, the dust that naturally gets absorbed by the carpet is not made to circulate through the air, making your room feel cleaner and fresher.
Unfortunately, the answer is not quite as simple as that! There are some additional things to consider when installing carpet over underfloor heating systems.
People often wonder whether they will get all the benefits of a UFH system if they also have carpet installed. Since carpet is naturally insulating, it might be the case that an underfloor heating system is less efficient when there is a layer of insulation to penetrate. It’s true that this could happen with particularly thick carpets, however there are simple ways to avoid reducing the efficiency of UFH systems.
Before installing your UFH, be sure to check that your carpet and any underlay does not have a combined Tog value of more than 2.5. Tog rating is a measure of thermal resistance, and you may be familiar with the term as it often relates to duvets. You should also consider the type of carpet as well as its Tog rating. Usually, carpets with hessian backing are recommended rather than those with a rubber backing. While these can be more costly upfront, they will likely save you money in the long run as they will help to maintain the efficiency of your underfloor heating.
Often, you will be able to consult with carpeting specialists when it comes to deciding which carpet will be best suited to rooms that will have UFH.
Another thing to consider when installing underfloor heating is making sure your contractor has all the necessary information about the size of each room, whether or not each room is already carpeted, and details about your current heating system (unless you are installing UFH in a newbuild). This is so that they can ensure your UFH system is performing at maximum efficiency.
When getting underfloor heating fitted, it’s important to be wary of cowboy companies who will not have concern about the efficiency (or potential lack thereof) of your UFH system. Some companies have been known to hide disclaimers in the small print, making you liable for any inconsistencies, breakages or inefficiencies.