When the world outside your window gets cold, a good boiler is there to keep your home nice and warm. But, running your boiler 24/7 can be expensive – setting up your boiler on a timer is a surefire way to save energy and money in your home.
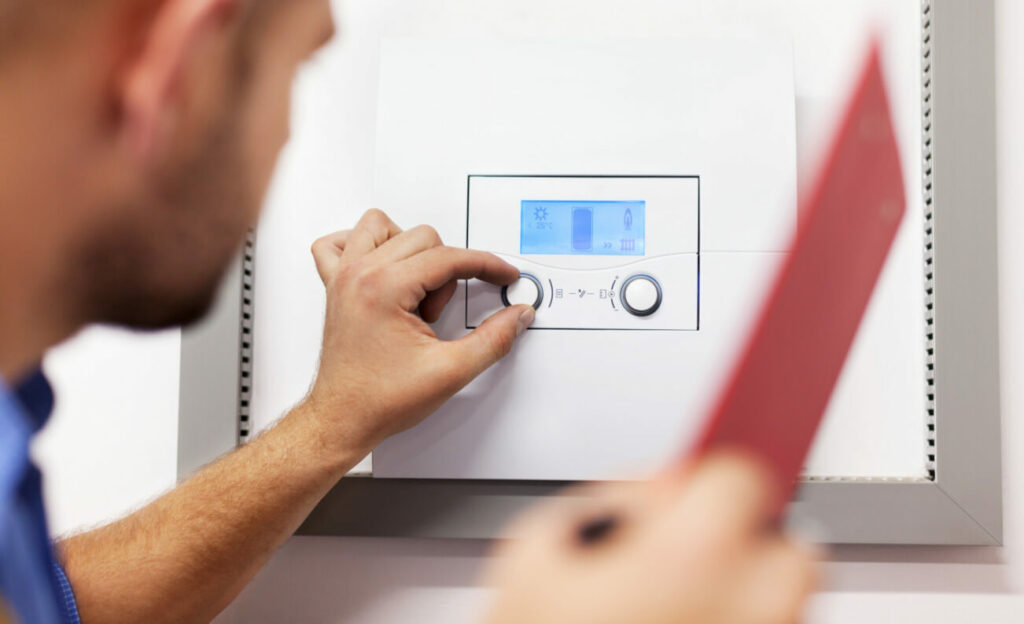
Boilers come inall shapes and sizes, and the first thing to know is that there are two types of boiler timers: digital timers and mechanical timers. Modern boilers tend to come equipped with a digital timer, whereas older models will probably be installed with a mechanical timer.
Knowing how to operate your boiler timer will save money on your heating bills and help do your bit for the environment. In this guide, we’ll walk you through how to set the timer on your boiler.
How to Set a Digital Timer
1. Ensure the time and date settings are correct
Look for a button which says “clock” or “set time” on your control panel. Press it. Next, use the arrow buttons to find today’s day or date, and press the “select” button to confirm. Use the same arrow buttons to adjust the time. When you have the correct time and date on your digital boiler timer, use the “select” or “set time” button to confirm the setting.
2. Enter scheduling mode
You probably won’t want to have your central heating running all day, every day. Scheduling, or programming, allows you to set specific times for the central heating system to turn on or off.
There should be a button which says “program” or “set” (on some models, this is a switch). Press (or slide) it to enter scheduling mode. Now it’s time to think about when you want the hot water or heating to come on.
3. Input the days and times you want the boiler to turn on
Again, use the arrows to navigate to the day of the week you want to set. Depending on the model and digital boiler timer you have, it may be necessary to select a time every day, or you may be able to group days together. Next, you’ll need to input the time for the boiler to come on. Once you have the desired time, use the “enter” or “select” button to lock it in.
4. Input the time you want the boiler to turn off
After you’ve selected the time for the boiler to turn on, the programmer will switch to setting the turn-off time. Just like before, use the arrows to set the time, and “enter” or “select” to confirm. Depending on the model, some digital boiler timers support more than one timed setting per day.
5. Save your settings and run your schedule
Press the “set” button to confirm everything. This will remember your settings, and begin running your new boiler schedule automatically. (If your boiler has a switch, slide it to “run”).
Pro tips:
While some digital boiler timers take care of time and date settings automatically, others require you to manually set the time and date, and with daylight savings to think about, it doesn’t hurt to check it once in a while.
Make sure you pay attention to AM or PM, and whether your boiler uses the 12 or 24 hour clock.
It’s always a good idea to consult your boiler’s manual. This will give you exact instructions for the boiler controls written by the manufacturer. 2 minutes reading will save 20 minutes spent fiddling with buttons.
Remember that it can take up to 30 minutes to get water up to temperature, so it’s a good idea to set your range for about half an hour before when you want to feel the central heating. Most people opt for ranges that include breakfast time, and when everyone is home from school or work, for example 6:00am-8:30am and 17:00pm-23:00pm.
How to Set a Mechanical Timer
1. Set the dial to the correct time
Every mechanical boiler timer will have a round dial. This should be fairly easy to identify. The first step is to set the current time. Rotate the dial clockwise until you have it correct. It may not spin anti-clockwise.
2. Choose the times you want the boiler to be running
The dial will be surrounded by pins. These look like a series of tiny switches, running all the way around. The important thing to remember is that each pin represents 15 minutes.
Have a look at the markings around the dial, and find the time you want your boiler to come on. Switch on the pin that corresponds to that time. (This may mean sliding the pin toward the center, or flicking it outward, depending on the model.) Push all consecutive pins, until you reach the time you want the boiler to turn off. For all times you want the central heating to be turned off, leave the pins as they are.
For example, if you want the boiler to be on from 06:00am-08:00am, switch on the pin at 6:00am, and every other pin until 08:00am. When the clock reaches 06:00am it will automatically start the daily cycle, and when it gets to 08:00am, it will automatically turn off.
3. Set the timer to run
This is an important last step but an easy one to forget. The mechanical timer will have a switch, with one option marked “timer” (this may be indicated by a small image of a clock). Make sure the switch is set to this position.
Pro tips:
A mechanical timer may be referred to as an analogue timer, or even a clockwork timer. They all mean the same thing.
If you get confused, the user manual is your friend! Many mechanical boiler timers have slightly different settings, so see what the instructions say. If you can’t find the paper manual, most boiler manufacturers publish the manual online for free.
Virtually all mechanical timers exclude daylight saving functionality – meaning that if the clocks go forward or backward, you’ll need to change the boiler clock, too.
Using the pins, it will be possible to select multiple ranges throughout the day, but bear in mind that it’s not the best idea to have your boiler constantly firing up and powering down. We’d recommend setting no more than two time ranges per day.
Don’t forget to set the timer switch at the end. If it isn’t set, the timer won’t function, and you’ll only be able to switch the boiler on or off manually. Of course, you can ask the boiler to ignore the timer schedule for a day or two, by simply flicking off this switch.
The Bottom Line on Boiler Timers
Whatever boiler model your home has, using the scheduling feature is a great way to save some cash and make your home more energy efficient. Energy costs are a concern for many, and understanding how your boiler timer works will give you the knowledge you need to keep those energy bills down and improve your home’s cost effectiveness. Plus, you’ll be able to stay warm and reduce your carbon footprint!
Are you having some trouble with your boiler? Not to worry. Chances are there’s an easy fix, and one of our professional engineers is on hand to sort it out for you. Repairs or new installs: we’re here to help. Get in touch today for a quote.
Used to monitor number of Google Analytics server requests when using Google Tag Manager
1 minute
_gac_
Contains information related to marketing campaigns of the user. These are shared with Google AdWords / Google Ads when the Google Ads and Google Analytics accounts are linked together.
90 days
_gid
ID used to identify users for 24 hours after last activity
24 hours
_ga_
ID used to identify users
2 years
_gali
Used by Google Analytics to determine which links on a page are being clicked
30 seconds
_ga
ID used to identify users
2 years
__utmx
Used to determine whether a user is included in an A / B or Multivariate test.
18 months
__utmv
Contains custom information set by the web developer via the _setCustomVar method in Google Analytics. This cookie is updated every time new data is sent to the Google Analytics server.
2 years after last activity
__utmz
Contains information about the traffic source or campaign that directed user to the website. The cookie is set when the GA.js javascript is loaded and updated when data is sent to the Google Anaytics server
6 months after last activity
__utmc
Used only with old Urchin versions of Google Analytics and not with GA.js. Was used to distinguish between new sessions and visits at the end of a session.
End of session (browser)
__utmb
Used to distinguish new sessions and visits. This cookie is set when the GA.js javascript library is loaded and there is no existing __utmb cookie. The cookie is updated every time data is sent to the Google Analytics server.
30 minutes after last activity
__utmt
Used to monitor number of Google Analytics server requests
10 minutes
__utma
ID used to identify users and sessions
2 years after last activity
Clarity is a web analytics service that tracks and reports website traffic.
Persists the Clarity User ID and preferences, unique to that site is attributed to the same user ID.
12 months
_clsk
Connects multiple page views by a user into a single Clarity session recording.
12 months
CLID
Identifies the first-time Clarity saw this user on any site using Clarity.
12 months
ANONCHK
Indicates whether MUID is transferred to ANID, a cookie used for advertising. Clarity doesn't use ANID and so this is always set to 0.
Session
SourceBuster is used by WooCommerce for order attribution based on user source.
Name
Description
Duration
sbjs_migrations
Technical data to help with migrations between different versions of the tracking feature
session
sbjs_current_add
Timestamp, referring URL, and entry page for your visitor’s current visit to your store
session
sbjs_first_add
Timestamp, referring URL, and entry page for your visitor’s first visit to your store (only applicable if the visitor returns before the session expires)
session
sbjs_current
Traffic origin information for the visitor’s current visit to your store
session
sbjs_first
Traffic origin information for the visitor’s first visit to your store (only applicable if the visitor returns before the session expires)
session
sbjs_udata
Information about the visitor’s user agent, such as IP, the browser, and the device type
session
sbjs_session
The number of page views in this session and the current page path